Computer Basics and PC Software Lab
Section 1: Power Point
Step
1: Open Microsoft PowerPoint.
Step 2: Go to File
Tab at the top of the screen and click New options. A box that says “New
Presentation” should appear on the right side of your screen.
Step 3: In the “New Presentation”
dialog box, click on “Blank Presentation”.
Step
4: You Can Insert the New Slide as Required. Here
We Can Have Maximum 10 slides.
We Can Insert New Slide In Our Presentation
By Using Shortcut Key Ctrl + M or Directly By Clicking On New Slide In Home Tab
.
Insert
the relevant picture of Internet on every slide
Step
5: Insert the relevant picture of Internet on every
slide .
Click On Insert -> Pictures -> Background Image and
Apply to All and you can also set
Trasparency of the Background Image.
Create
animation on the picture of the study centre.
Step
6: Insert The Picture Of Study Centre .Create
animation on the picture of the study centre.
Slide animations, when used properly, can
add some flair to your presentation. You can use animations to make your text
and images appear on the screen dramatically or to make smooth transitions
between slides and topics.
Adding
Animation To A Slide:
PowerPoint
07 provides preset animations to allow you to easily add animations to any
object on your slide. This includes text, images, clipart, charts and SmartArt.
While the preset options PowerPoint provides are quick and easy, we
strongly recommend using the custom animation options which allow
you more control over the animations (see below).
1.
Click on the object or text box you wish to animate to select it (hold
down the Ctrl button while clicking to select more than one).
2.
In the Animations tab under the Animations group, select an option from the Animate pull-down list. As you hover your mouse over each
choice PowerPoint will preview the effect on your slide.
3.
Repeat for any other
slides or objects you wish to animate.
Make All the
Slides Of Common design : same title
style, color background, page numbers
Step 7:
To apply common design on all slide , Go the Insert Menu
-> Choose Header And Footer, and apply to all
SLIDES NOTES and
Speaker Notes
Step 8: Insert slide notes on Each Slides.
Inserting Notes
There are two ways to insert notes to a slide:
There are two ways to insert notes to a slide:
1 From the Normal View, click on
the notes area at the bottom of the screen and start typing:
This method works fine when you have just a
couple of lines to add as notes.
If you want to add longer notes, you can
click on the View menu > Notes Page. In the Notes View each
page corresponds to a slide in your presentation and includes a reduce image of
the slide. You can insert text, drawings and even pictures in the Notes view in
the same exact way that you do in Slide View.
Speaker notes is a concept used in
presentations and Microsoft PowerPoint has a special section in the slide that
you can use for speaker notes.
After setting all the themes and layouts, Now You can write the topic on which you are going to represent yourself which is Internet Definition, Impact of Internet on our lives and a brief history of Internet.
Section 2: Outlook
Ans:-
i)
If you are the meeting organizer, you can send an email to all meeting attendees with following steps.
Step 1: Shift to the Calendar view, and double click to open the meeting whose attendees you will send email to.
Step 2: Click the Contact Attendees > New E-mail to Attendees on the Meeting tab. See screen shot:

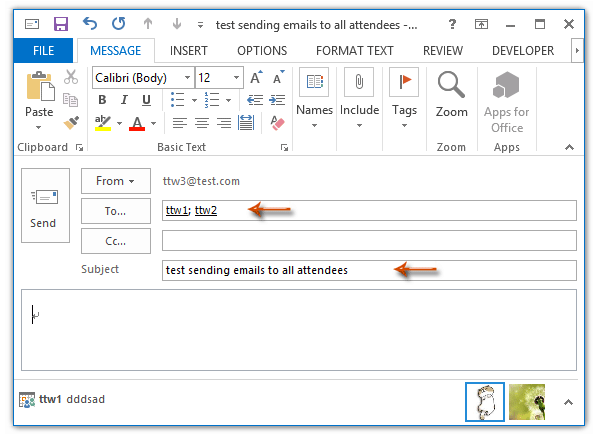
Then a blank email is created with the subject and recipients of all meeting attendees. See screen shot:

Step 3: Compose this email, and click the Send button.
Change an event to an appointment
Events are all-day items that appear as free time on your calendar. A conference or a vacation is an example of an event.
You can change an event into an appointment, by opening the event, and then clearing the All day eventcheck box. Now, as an appointment, the time is marked as busy on your calendar. If you add attendees, your appointment becomes a meeting.
1) After you finish making changes, click Save & Close.
If you want to keep the event as an all-day event, but show the time as something other than free on your calendar, change Show As.
- Open the event on your calendar.
- Click Event.
- Change Show As to Busy, Working Elsewhere, Tentative, or Out of Office.
- Click Save & Close.
ii)
The instructions provided below include information on scheduling a meeting by invitation to others, which could include a room or resource.
- If you would like to have a room set up as an Exchange resource so that it can be scheduled into a meeting invitation, please submit a Help request.
- If you would like information on scheduling just a room or resource through its shared calendar, please refer to the the Shared Calendar page.
Outlook 2010 for Windows
- Open Outlook and switch to the Calendar.

- Click the New  Meeting button that is located in the  Home menu.

- Enter the Subject and A Location for your meeting. To locate rooms available for reservation in Exchange, click on the Rooms button to the right of the Location field.
- In the To field, type the BU email addresses of the people you would like to invite to your meeting.

- If you do not know the email address of an invitee, or would like to reserve a meeting room that is not set as a location, click on the To… button to open the Address Book. When searching for resources (e.g., meeting rooms, conference phones, etc.) and individuals using the Address Book, select Required, Optional, or Resource for each invitee — you may change these settings later using the Scheduling Assistant. Click OKwhen you have found all of the contacts you need.

- Choose the time and date by changing Start time and End time.
- Enter the message you would like to be included in your invitation.
- Switch to the Scheduling Assistant tab to verify that all of your attendees and resources are available for the time you chose.

If not, you may change the time by clicking and dragging the meeting time. You can also add, remove, or modify attendees and resources using the Scheduling Assistant. - When your meeting options are set, click Send
Section 3: Spreadsheet
Ans:-
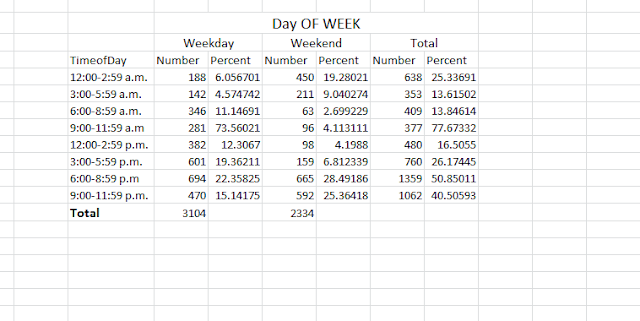
(i) Calculate the total number of pedestrian killed that occurred
during weekdays.
=SUM(E5:E12)
ii) Calculate the percent of all weekday pedestrians killed that
occurred during each of the given times of day.
=(E5*100/E13)
iii) Calculate the total number of pedestrians killed that occurred
during weekends.
=SUM(G5:G12)
iv) Calculate the percent of all weekday pedestrians killed that
occurred during each of the given time of day.
=G5*100/G13
v) Calculate the total number of pedestrian killed that occurred during each time of day (i.e., add weekday and weekend pedestrian killed for each time of day). Create a bar graph for the percent of all pedestrian killed by the time of day
Section 4: Word processing
Q.4 a)
Create a 3-page document in 3-column format. In the first page you
insert an image and write text around the image and in the remaining
pages you insert tables.
Ans:-
First opem MS Word from All Programs -> MS OFFICE-> MS WORD
Creating columns
Writer allows you to create columns in your text documents. You can apply columns to a
page style or to an individual block of text, and you can format the column layout according
to your preferences.
This chapter shows you how to:
• Apply columns to a page style.
• Apply columns to an individual block of text.
• Format a column layout.
• Revert to a single-column layout.
Applying columns to a page style
To apply columns to a page style, click anywhere on the page and then chooseFormat >
Columns... from the main menu. The Columns window opens.
Inserting Image and Text Wrapping
First Insert The Iamge from the Insert Tab and Select Picture option from the Ribbon.
After inserting the image , write text above/below image and then select image , and go to the
Format Tab
Create Column in MS WORD
b) Create a table of contents and footnotes for the above document.
Ans:-
Insert the table of contents
Now for the easy part! Once you've applied heading styles, you can insert your table of contents in just a few clicks. Navigate to the References tab on the Ribbon, then click the Table of Contents command. Select a built-in table from the menu that appears, and the table of contents will appear in your document.
Section 5: Browsing and Discussion Forum
Ans:-
(i) Review at Life Hacker
(ii) Review at Wire Cutter
(iii) Review at PLOS
(iv) Review at Searchdatacenter techtarget
(v) Review at Computer Hope
(vi) Review at Wikipedia
(vii) Review at Business Dictionary
(vii) Review at Webopedia
(ix) Review at Encyclopedia
(x) Review at Cable Organizer
ii) Search for the keyword “microprocessor”
Ans :- Keyword of "microprocessor" is "micropro" and the you search about the content of "microprocessor".
iii) Review the result of search and consider the similarities and
differences between different microprocessors.
Ans :-
(i) Review at Life Hacker
Power outages, surges, and brownouts can all wreak havoc on your electronics, and while a good surge protector can definitely help, a solid battery backup will keep your gear safe from surges, condition the power as it comes in, and keep your gear running until you can turn it off safely in case of an outage. This week, we're looking at five of the best, based on your nominations.
(ii) Review at Wire Cutter
After researching more than two dozen models, interviewing experts, and having an electrical engineer test our top candidates, we found that the CyberPower CP685AVR is the best uninterruptible power supply (UPS) for people who want to keep a home network running during a blackout of an hour or less.
(iii) Review at PLOS
Seasonal variation of manic and depressive symptoms is a controversial topic in bipolar disorder research. Several studies report seasonal patterns of hospital admissions for depression and mania and variation in symptoms that appear to follow a seasonal pattern, whereas others fail to report such patterns. Differences in research methodologies, data analysis strategies, and temporal resolution of data may partly explain the variation in findings between studies
(iv) Review at Searchdatacenter techtarget
A UPS contains a battery that "kicks in" when the device senses a loss of power from the primary source. If you are using the computer when the UPS notifies you of the power loss, you have time to save any data you are working on and exit gracefully before the secondary power source (the battery) runs out. When all power runs out, any data in your computer's random access memory (RAM) is erased. When power surges occur, a UPS intercepts the surge so that it doesn't damage the computer.
(v) Review at Computer Hope
Short for Uninterruptible Power Supply, UPS is a hardware device that provides a backup power source in case of a power outage (blackout), brownout, or a surge in power. A UPS provides enough power for a computer(s) to shut down properly or remain functional during the outage. There are three versions of the UPS: standby, on-line and line interactive. The picture shows an APC battery backup power strip.
(vi) Review at Wikipedia
An uninterruptible power supply, also uninterruptible power source, UPS or battery/flywheel backup, is an electrical apparatus that provides emergency power to a load when the input power source or mains power fails
(vii) Review at Business Dictionary
Backup power supply that, in case of power failure or fluctuations, allows enough time for an orderly shutdown of the system or for standby generator to start up. UPS consists usually of a bank of batteries and power sensing and conditioning circuitry, and comes in two basic types: (1) Continuously-Online UPS provides steady and clean (spike free) AC power even when the mains power supply is available, and is recharged continuously by the mains supply. Also called true online backup. (2) Standby UPS automatically comes on when the mains supply fails or fluctuates inordinately. Its batteries are recharged when it is not in use.
(vii) Review at Webopedia
Short for uninterruptible power supply, a power supply that includes a battery to maintain power in the event of a power outage. Typically, a UPS keeps a computer running for several minutes after a power outage, enabling you to save data that is in RAM and shut down the computer gracefully. Many UPSs now offer a software component that enables you to automate backup and shut down procedures in case there's a power failure while you're away from the computer.
(ix) Review at Encyclopedia
(Uninterruptible Power Supply) A device that provides battery backup when the electrical power fails or drops to an unacceptable voltage level. Small UPS systems provide power for a few minutes; enough to power down the computer in an orderly manner, while larger systems have enough battery for several hours. In mission critical datacenters, UPS systems are used for just a few minutes until electrical generators take over.
(x) Review at Cable Organizer
Uninterruptible Power Supplies fall into two categories: the first (and most commonly used) type is known as a Standby, or Offline, UPS. Under normal circumstances, a Standby UPS acts as a sort of electrical middleman: it plugs into a wall outlet, and distributes the AC power from that outlet to the other electronic devices it’s connected to. Aside from distributing power, UPS units typically also provide surge protection.
iv) While preparing the report, also capture some screens images of
microprocessors and include in the report.


Its very nice information …...keep it up
ReplyDeleteignou solved assignment
handwriting solved assignment
ignou solved assignment 2020-21
ignou project
ignou help book
ignou study material
ignou question paper